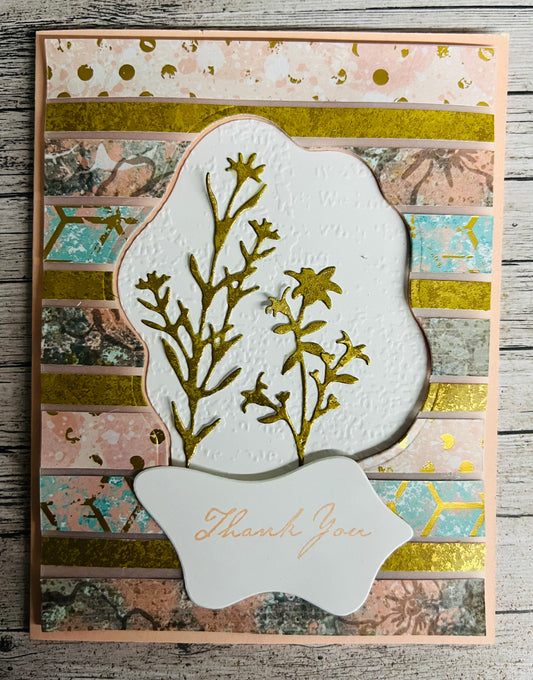


We tried our hand at the Floating Vellum technique during our September monthly card class. You can give it a try too using any designer series paper that you may have on hand but if you like the Textured Chic look, the item numbers for items we used on these cards are below along with the instructions.
|
Stamp Sets |
Honeybee Home Nature’s Harvest |
157943 156495 |
|
Card Stock |
Basic White Petal Pink Vellum Gold Foil Sheets |
159276 146985 101856 132622 |
|
Designer Series Paper (DSP) |
Texture Chic Distressed Gold |
158808 159237 |
|
Ink |
Balmy Blue |
147105 |
|
Dies |
Layering Diorama Honeybee Bloom Harvest |
155565 157951 156504 |
|
Embossing Folder |
Timeworn Type 3D |
156505 |
NOTE: This will make 2 cards.
- Cut 2 pieces of Petal Pink card stock to 5 ½” x 8 ½” and score on the 8 ½” side at 4 ¼”
- Cut a piece of Vellum to 4” w x 5 ¼” h.
- Choose 3 coordinating pieces of Texture Chic
- Cut 7 pieces to 4” w x ½” h
- Cut 4 pieces of the Distressed Gold specialty DSP to 4” w x ¼” h
- Adhere all the strips of DSP to the Vellum piece using liquid glue.
- Using the 4th largest Diorama die, cut from the center of the DSP/Vellum piece.
- Cut a 4” x 5 ¼” piece of Basic White card stock.
- Emboss with the Timeworn Type 3D embossing
- Use the same (4th largest) diorama die and cut from the center.
-
Card #1: set the “full” Vellum/DSP piece on to the card front (don’t adhere yet), then add liquid glue to the back of the Basic White embossed piece and place inside of the Vellum/DSP piece.
- Now you can add Stampin’ Dimensionals to the back of the Vellum/DSP piece and adhere to card front.
-
Card #2: Adhere the “full” embossed Basic White piece using either Snail adhesive or liquid glue.
- Then add Stampin’ Dimensionals to the back of the die cut Vellum/DSP piece and adhere to the center of the basic white piece.
- Using Gold Foil sheets, cut 1 large daisy flower from the Harvest Dies set and 1 of each of the 2 smallest floral dies from the Honeybee Bloom die set.
- Adhere the large daisy cut to card #2 and the small floral cut outs to card #1 using liquid glue.
- Using the smallest diorama die, cut 2 pieces from Basic White card stock.
- Using Petal Pink ink, stamp the sentiment “Miss You” from the stamp set Honeybee Home stamp set and “Thank You” from the Nature’s Harvest stamp set to the center of these pieces.
- Adhere to the card front using liquid glue.
- Cut a 4” x 5 ¼” piece of Basic White card stock and adhere to the inside of the card using Snail adhesive.